Understanding the concept
The
Remote desktop service(RDS) in windows server 2008 R2 is the renamed and
advanced version of terminal server service that is available in windows server
2003. This feature enable users to access Windows-based programs that are
installed on a terminal server or to access the full Windows desktop. Users can
access a remote desktop server within the corporate network or from the
Internet. When a user accesses a program on a terminal server, the program
execution occurs on the server and only keyboard, mouse and display information
are transmitted over the network. Each users sees only their individual session
and the session is managed transparently by the server operating system, it is
independent of any other client session. Remote desktop service is useful
especially when you have programs that are frequently updated, infrequently
used, or difficult to manage. Let us consider the scenario that, your
organization has got its own application which is private and you need to
access it from outside the organization, or deployment of multiple versions of
an application, especially if installing multiple versions locally would cause
conflicts and many other cases. The more details are described here in MS tech
center,
When you
are planning to implement remote desktop service, there are few terms that you
must understand.
1. Remote
Desktop Session Host(Terminal server)
Remote
desktop session host is the server where we hosts the application that are
required for TS clients. Users can
connect to a terminal server to run programs, to save files, and to use network
resources on that server. So the servers that have this feature installed will
act as your remote desktop server.
2. Remote
Desktop Licensing(TS Licensing)
The RD
licensing will manages the Remote Desktop Services client access licenses (RDS
CALs) that are required for each device or user to connect to a Remote Desktop
Session Host or Remote Desktop Virtualization Host server. You use RD Licensing
to install, issue and track the availability of RDS CALs on a Remote Desktop
license server. The grace period of this service is 120 days and a permanent
RDS CAL should be purchased. There are several methods to purchase the
license and those are mentioned on MS article(http://technet.microsoft.com/en-us/library/cc771547.aspx). The License Server role can be installed on
your Session Host server or in a dedicated server. If we install Remote Desktop Licensing role
on a dedicated server any additional RD Session Hosts that we add in the future
can share this service. However this roles is not required to be configured
with initial stages as we have a trial license for 120 days.
3. RD Web
Access(TS web access)
RD Web
Access allows the users to get access with the applications and server desktop
that are allowed to the clients. In order to achieve this, users can visit the
web site that are configured by remote desktop administrators through their web
browsers(IE, chrome, Firefox etc.). When the users starts a RemoteApp program,
a terminal Services session is started on the terminal server that hosts the
RemoteApp program. When you deploy RD Web Access, you can specify which
terminal server to use as the data source to populate the list of RemoteApp
programs that appears on the Web page.
4. Remote
Desktop Gateway(TS gateway)
This
role enables authorized remote users to connect to resources on an internal
corporate network from any Internet-connected device that can run the Remote
Desktop Connection (RDC) client. RD gateway improves the security by
establishing an encrypted connection between remote users on the Internet and
the internal network resources(hosted on Remote desktop server). Note that, RD Gateway role service require other roles to be installed for its
functionalities(Ex: Network policy and access service ,Web Server (IIS)) and
those will be installed automatically
during the role installation.
5. RD
Connection Broker(TS session broker)
RD
Connection Broker have one of the vital role in remote desktop service. It
keeps track of user sessions in a load-balanced terminal server farm. You can
make use of Windows failover clustering feature to achieve this. The RD
connection broker saves session state information, associated user of
particular session and server where each session exists. When a user who has
existing session connects back to terminal server the RD connection broker
identifies it and redirects to the server where its session exists. This prevents the user from being connected
to a different server in the farm and starting a new session.
6. Remote
Desktop Virtualization Host
RD
Virtualization Host integrates with Hyper-V to provide virtual machines that
can be used as personal virtual desktops or virtual desktop pools. If a user is
assigned and requests a personal virtual desktop, RD Connection Broker
redirects the user to this virtual machine. If the virtual machine is not
turned on, RD Virtualization Host turns on the virtual machine and then
connects the user.
I hope
the above information is good enough to understand the various roles that comes
under remote desktop service. Now let us see how to install and configure these
roles,
Installation and configuration
In my
environment I am going to install the
roles Remote Desktop Licensing, Remote
Desktop Gateway, RD Connection
Broker, RD Web Access and Remote Desktop
Session Host on the same server and I don't want the service remote Desktop
Virtualization Host as I don't have Hyper V installed.
Note: It is not recommended to install and
configure RDS on an active directory server as it can reduce the security and
decrease performance of server, however you can do it if required.
It is
recommended to install remote desktop session
host before you install any applications that you want to make available
to users. Else the application may not work as expected for clients.
1. Log on to the server
where you want to install RDS as the user who has administrator and enterprise
admin rights.
2. Open Server Manager, click Start-> Administrative Tools->Server Manager.
3. Under the Roles Summary heading, click Add Roles.
4. In the Add Roles
Wizard, if the Before You Begin page
appears, click Next.
5. On the Select Server Roles page, select the Remote Desktop Services check box, and then
click Next.

6. On the Remote Desktop Services page, click Next. This is just a brief idea about remote
desktop services.

7. On the Select Role
Services page, select Remote Desktop
Licensing, Remote Desktop Gateway, RD
Connection Broker, RD Web Access and
Remote Desktop Session Host. If you are installing Remote Desktop Session Host on the active directory server you
will have the warning message as it is not recommended, Click install Remote Desktop Session Host (not recommended) and select the other features. As
described earlier, You may need to install additional features to support Remote Desktop Gateway so select Add required role
services when it
prompts. Click Next
to continue,

8. On the Uninstall and
Reinstall Applications for Compatibility page, click Next. Hopes you have got the message.

9. Next
step describes you about the level of authentication that you require for
RDS(remote desktop service). It is recommended to enable network level authentication and you can
select the option as required. If you have Windows XP clients to access RDS you
should not enable Network level authentication as it is not having the upgraded
version of remote desktop connection client. You can select network level
authentication if your clients are at lease windows 7 or later. Click Next,

10. You
need to specify the licensing mode that you want to use for using RDS. It can
be purchased either for per user or per computer. Else you can install the
license later as we have 120 days trial period. I am selecting as trial and
continue where as you can install the license now or later.

11.
Select the user groups that can access the remote desktop server and its
services. I am selecting all the users of my domain and you can achieve the
same by clicking on Add button. If you
have a specific set of users that have to access terminal server you can create
a group in active directory and add the groups to this list later as well.
Note: Administrator users are default in this
operation and cannot be removed.

12. Now
you can specify the client experience, this settings are optional and select as
required. Please note that, when we enable more functionalities that can lead
to high system and bandwidth usage which may affect the performance RD session
host server. So reduce the feature if it is really not required.

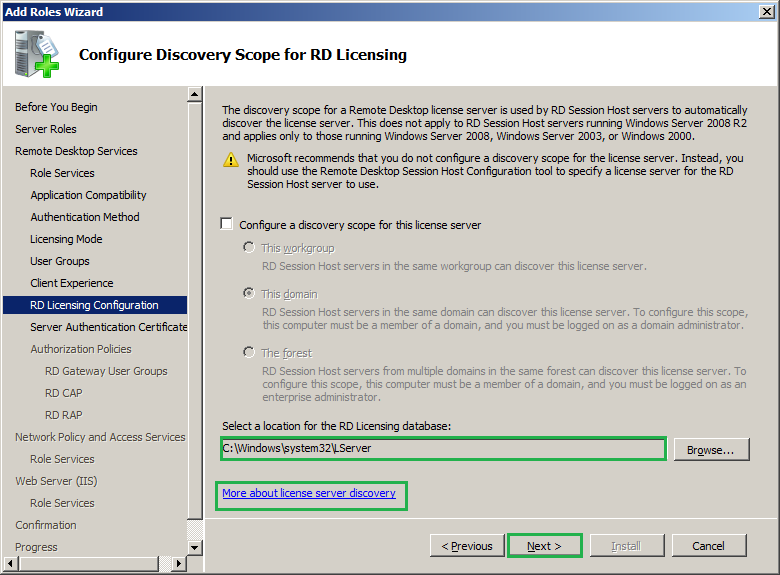
13. Next
you need to specify the discovery scope for RD licensing. It is used by RD
session host servers to automatically identify and discover the licensing
server. Leave the selection as default and you can the RD licensing database
location if required. It would be really worth if you can click on the link More about licensing directory to get much
better experience on this.
14. You
must have a certificate for SSL communication. It is recommended to get the
certificate from a trusted certificate authority(CA) especially when you have
to access the RD session from outside network. In my case I have one self
signed certificate installed on my server and it is list automatically here. If
you do not have any certificate installed on server it will not list and you
can import that now by clicking Import
button. If you want to create a SSL certificate now, you must select the second
option create a self-signed certificate for SSL
encryption or you can select the third option choose a certificate for SSL encryption. Make sure that the SSL
certificate is attached to HTTPS binding on your IIS.
If you
have any doubt about creating SSL certificate. I believe this link will be
useful http://serverlabs.blogspot.in/2014/03/how-to-create-self-signed-certificate.html
I will
continue with my existing SSL certificate. Click Next
to continue,

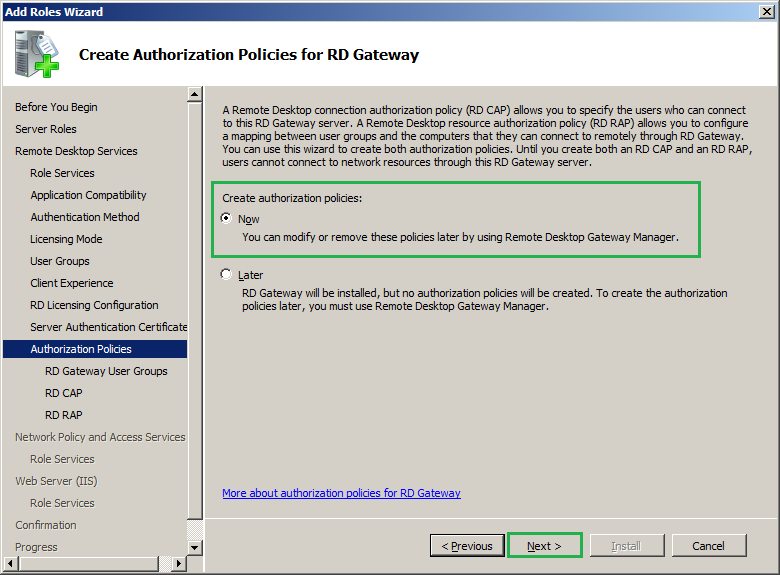
15. Now
on you need to specify the authorization
policies that will control the RD session host clients with the way it
is allowed to connect. There are two important terms to understand in this
concept, that are Remote desktop connection
authorization policy(RD CAP) and Remote
desktop resource authorization policy(RD RAP). In simple words, RD CAP
describes the users that can connect to this RD gateway server and RD RAP
allows us to specify which terminal server is allowed for users to connect from network. Until we configure RD RAP and
RD CAP users will not be able to connect to RD server, so I will configure this
policies now. Select Now under create authorization policies and click Next.
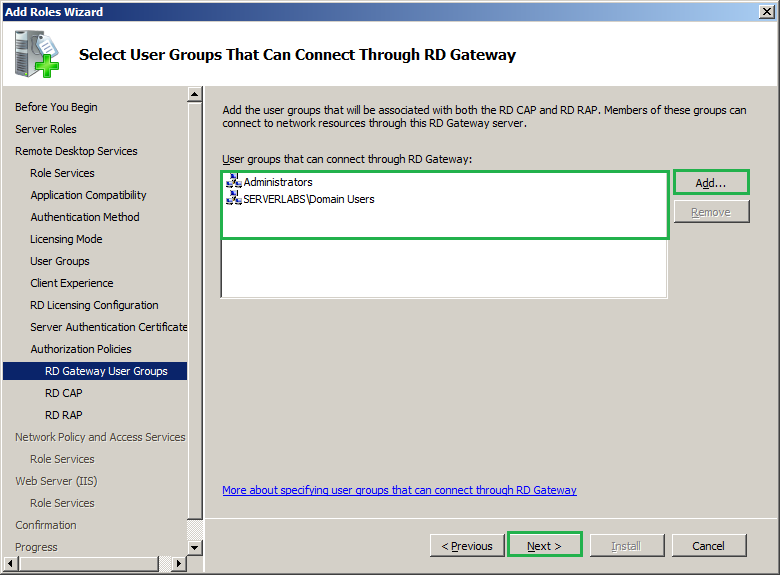
16. Under
User group membership (required), click Add button, and then specify a user group whose
members can connect to the TS Gateway server. You must specify at least one
user group and I have allowed it for all my domain users. In this session you
might be little confused as we have already configured the user groups that can
access the RD server at step 11. All you want to understand is, step 11 is
defined for RD session host server and as
you know RD gateway is an additional security feature for RD server here you
are specifying the users that are allowed to connect through RD gateway. Hence
the same user group is mentioned here as well, Click Next to continue.
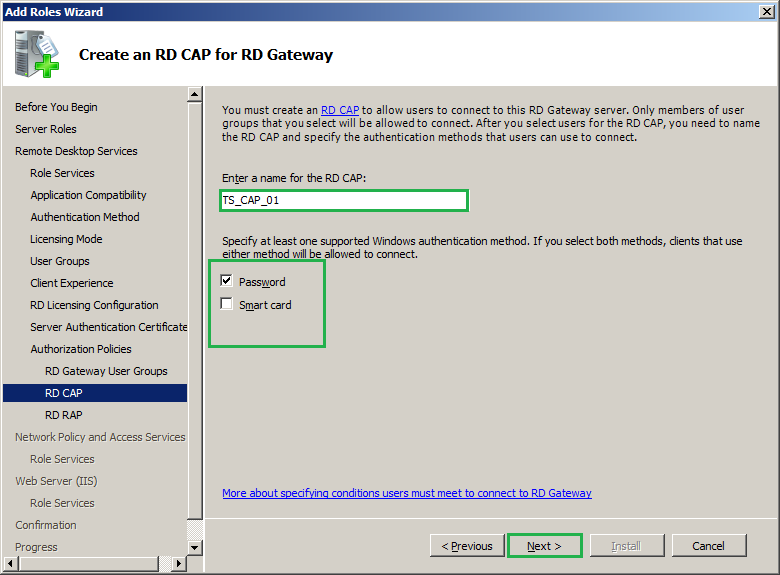
17. In
the above step we have specified the user group that can connect. Here you must
specify a name for RD CAP and specify at lease one way of authentication that
are required for users. You will have a default name and it can be edited if
required, for example, if you are allowed users of a particular group to access
the RD server it would be worth to customize the RD CAP name which will help us
to identify the policies easily in future. Windows authentication can be either
password or smartcard which determines how the users are authenticated to get
the access to RD server. In my case I am setting the RD CAP name as default and authentication method only Password. Click Next,
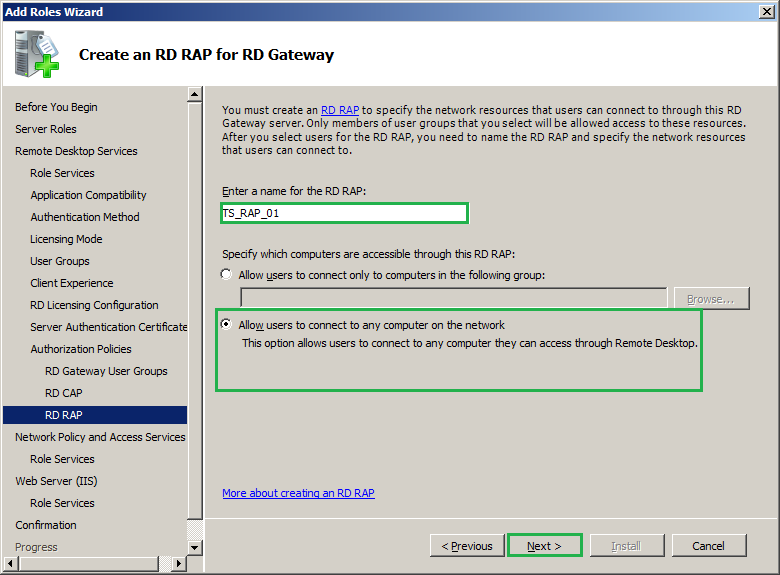
18. Here
you want to specify the details for RD RAP. The RD RAP can be either the
default or customized one as per your choice. Here you must specify the network
resources that the RD users can connect through, When a RD user connects and we
need to set him the limitation of accessing the computers you can specify this
settings here. For example, When the user 'Livin' connects through RD gateway
and he needs to access only a group of computers, you can select the second
option Allow user to connect only to computers
in the following groups and set the group. In my scenario I have allowed
all of my domain users to use RD service and I am not settings the limitation
for this so selecting Allow users to connect to
any computer on the network. Define the settings as required for you and
click Next.
19.
As discussed above, for RD
gateway to function properly we need to have certain
features to be installed. That are Network policy and access service ,Web Server
(IIS). Now you will have the introduction and confirmation to install these
features, simply click Next to get it done.


20. Now
we will have the summary of the configurations that we done so far. Review
those and click install to start the
installation.

21. Once
the installation is completed you can close the window and you must restart the
server to complete this operation.

22. Once
the server is rebooted, you must login and the installation will continue which
will end up in below window, Click Close.

This
completes the installation and basic configuration of Remote desktop server.
The advanced level of configuration can be viewed on this link.