How to install and configure DHCP server in windows server 2008

Understanding the concept

A Dynamic host configuration protocol(DHCP) will alloy you to assign the IP address for a large number of clients automatically. DHCP protocol will assigns unique IP addresses to devices, then releases and renews these addresses as devices leave and re-join the network. DHCP environments require a DHCP server set up with the appropriate configuration parameters for the given network. Key DHCP parameters include the range or "pool" of available IP addresses, the correct subnet masks, plus network gateway and name server addresses. Devices running DHCP client software can then automatically retrieve these settings from DHCP servers when needed. DHCP clients are built into all common network operating systems. Using DHCP on a network means system administrators do not need to configure these parameters individually for each client device.

Configuring DHCP service

1. Open 'Server manager'-> 'Add roles'-> Click on 'Next' button in Welcome window.
2. Select 'DHCP Server' and click 'Next'.


3. Have a look at the Introduction to DHCP window and click 'Next'. If you would like to have more details about DHCP you can click on 'Additional information' link and it will redirect you to the necessary websites.


4. On next window you will re-directed to 'Network bindings' which will automatically detects the available static IP address in the server. When you have more than one static IP you can use the each network connection can be     used to service DHCP clients on a separate subnet. If you do not require any static IP as the part of DHCP you can un-tick that and Click 'Next'.


5. Now you need to specify the 'IPV4 DNS settings'. It will automatically  detect the DNS settings in your network. If these details are wrong edit it and click 'Next'. You can test the connectivity of DNS by clicking on 'Validate' button.


6. Since I don’t want the WINS service in my network now I have selected 'WINS is not required for applications in this network' and click 'Next'.


7. Now you need to specify the scope of the DHCP server that will allocate in your network. You should specify the starting and ending IP address, Click 'OK'.


8. Now you need to specify whether you need to configure IPV6 stateless mode for this server. I will disable this service since IPV6 does not exist in my network and click 'Next'.


9.Please specify the Active directory integration details. It will automatically identify the logged on user or   change other user who have necessary privilege in AD.


10. Now you will have the summary window that will list out all the specifications that you have made so far. You can either save or e-mail this for future reference. In order to continue with installation click on 'Install'.


11. Click 'Close' and you can open your 'DHCP' services from 'Administrative tools'.


How to install and configure DNS server in windows server 2008

Understanding the concept

The Domain Name System (DNS) is a hierarchical distributed naming system for computers, services, or any resource connected to the Internet or a private network. It associates various information with domain names assigned to each of the participating entities. Most prominently, it translates easily memorized domain names to the numerical IP addresses needed for the purpose of locating computer services and devices worldwide. The Domain Name System is an essential component of the functionality of the Internet. For example, When considering an internet zone Google maintains various DNS servers around the world that manage the google.com, google.co.uk, and other domains. Your ISP also maintains DNS servers as part of your Internet connection setup. DNS networking is based on the client / server architecture and when you consider your Web browser it functions as a DNS client (also called DNS resolver) and issues requests to your Internet provider's DNS servers when navigating between Web sites.
When a DNS server receives a request not in its database (such as a geographically far away or rarely visited Web site), it temporarily transforms from a server to a DNS client. The server automatically passes that request to another DNS server or up to the next higher level in the DNS hierarchy as needed. Eventually the request arrives at a server that has the matching name and IP address in its database (all the way to the root level if necessary), and the response flows back through the chain of DNS servers to your client.

Configuring DNS in your network


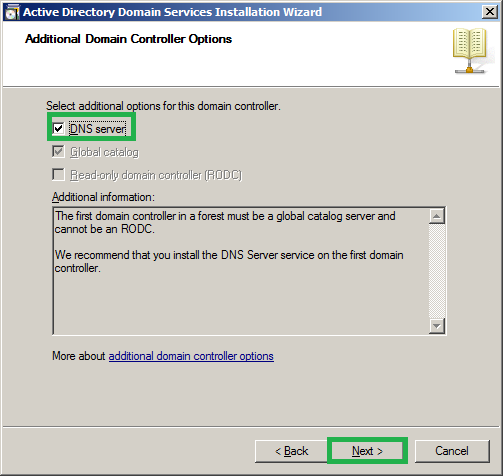
You can do it either in a domain or a workgroup. If your server is a domain controller probably during the installation of Active directory you may installed those service. For example at the below step you might be specified to install DNS service.


1. Else you can install the service from server manager. Open the 'Server manager' from 'Administrative Tools'->Roles->Add role
2. Click 'Next' on welcome window and you will see the server role 'DNS server' is listed there(In my network it is already installed and hence the status is grayed out).


3. If it is not installed put the tick mark against 'DNS server' and click 'Next'->'Next' on introduction windows as well->Select 'Install'. Once it is completed successfully follow the below steps to configure DNS in your network.

4. From 'Start'->'Administrative tools'->'DNS'.
   When configuring DNS you must be familiarize with the zone concepts. There are three zone in DNS and that are 
   a) Forward lookup zone
   b) Reverse lookup zone
   c) Conditional forwards
In simple words we can define it as 'Forward lookup' converts an Internet name to an IP address. 'Reverse lookup' converts the IP address to the Internet name(host name in a LAN). Generally these conversions are called as 'IP address lookup'. 'Conditional forwarders' are nothing but as the name implies it will forward the request of a user specified categories to another DNS server/s. For example if a request comes ending with the name 'serverlabs.com' we can redirect all those request to second server. It can be used as a load balancing of your DNS server. More details of the same can be fetched from the below link:
   By default when you install the DNS server with Active directory we will be having forward lookup zones configured automatically and it is enough to have this if your network is small. 

5. From the DNS console select your server name and right click on it. This will list out the options for you to configure and select 'Configure a DNS Server'. Else Actions->New zone.


6. Click 'Next' on welcome window and now you need to specify the configuration that we need to make now.
 a. Create a forward lookup zone
 b. Create forward and revers lookup zone
 c. Configure root hints only.

As the first two options are most familiar I am not describing it once again. Where as when you consider 'Configure root hints only' in simple word this will help you to redirect your first DNS requests to a server which can globally resolve these requests. Such as you can specify one of the root hint server as Google.com's IP which can resolve most of the internet requests. By default it will have a list of 13 global DNS in your server(You can see this by selecting the 'Properties' of your DNS server->Select 'Root hints'). If you remove those entries it is must that you should have at least
a forwarders configured it resolve the names. When you do not have any forwarders configured your DNS server it uses 'root hints' to resolve the name. Hence this is highly essential and this option will be enabled by default and you can add root hint servers if it requires.


7. Since we are looking to configure forward lookup zone please select the second option '
 Create forward and revers lookup zone' and click 'Next'. This will allow you to configure forward and backward lookup zone in a single shot :)


8.Since we need to configure forward look as well I have selected 'Yes, create a forward lookup zone now(recommended)' and click 'Next'.


9. Now you need to specify the 'Zone' type. There are three types that we have like primary zone, secondary zone and stub zone you have the descriptions also. Here my records are going to save on same server and hence I am selecting 'Primry zone' and click 'Next'.


10. Specify the zone name that you would like to have and click 'Next'.


11. If you have a zone file that is copied from another server you can simply allow this to have the information             about the zone(make sure that you have copied that file to '%SystemRoot%\system32\dns') else you can create a new one. Since I don't have this I need to create this, Click 'Next'. 


12. Next you need to specify the 'Dynamic update' settings of your zone.

The automatic update of DNS records in the DNS database is technically known as ‘Dynamic Updates’.

  1. 'Allow only secure dynamic updates'- This will allow you to configure only when the zone is created during the active directory  installation. Any changes in the clients will be automatically changed on the DNS database as well.
  1. 'Allow both secure and non-secure dynamic updates'- Configuring this option will leave your network   less secure because updates will be accepted from unknown clients.
  1. 'Do not allow dynamic updates'- This will disable the dynamic updates in your network. Once you configure this you need to manually make changes of clients.
Dynamic update settings can be changes after the configuration. Select the Zone->'Properties'->Under 'General' change the 'Dynamic updates' as required.

Since this is not my Active directory integrated zone  this option will be grayed out and I cannot opt this. Hence I am selecting the second option to continue with. If you need to make it to active directory integrated zone, on step 9 you need to 'tick' the check box 'Store the zone in active directory' and continue installation(I have configured the Revers lookup zone as Active directory integrated).


13. From the next window onwards we will start with the configuration of Reverse lookup zone. Click 'Next'.


14. Here I am going to specify the same configurations as followed for Forward lookup zone. Hence the above descriptions will be enough for you to configure reverse lookup zone as well.


15. Now you need to specify how you want the DNS data replication through the network.
                    Since I need the data replication for all domain controllers in my network I am selecting the second                       option and click 'Next'.


16. Select the IP protocol version that you want to create, either IPV4 or IPV6.


17. Now specify the network ID of your network and click 'Next'.


   18. Specify the 'Dynamic update' settings as you require. The description given under forward lookup zone may help you to decide this.


19. If you need to configure the forwarders you can specify that as well(Details of 'conditional forwarders' are specified above). Since I don’t want to configure forwarders I am not doing it.


20. Click on 'Next' and it will give you the below windows and click on 'Finish'.


21. Now you can see the DNS  zones created in your DNS console.


Troubleshooting DNS server in server 2008

You may have different issues in DNS service such as DNS sever not responding to the clients or DNS server does not resolve the names correctly. Here I have some of the steps that will help you to troubleshoot and resolve some of the common issues.

DNS sever not responding to the clients

  1. Make sure that there is no connectivity issue between your computer and DNS server

As you know the connectivity issues between the host and server is most important part, you should make sure that there are proper connectivity between client and DNS server. First, check that related client hardware (cables and network adapters) are working properly at the client by using basic network and hardware troubleshooting steps.
  1. Ping your DNS server and Additional DNS server and make sure that that are reachable.
  2. Check whether the DNS settings are correctly mentioned in your NIC card properties. If you are using DHCP service DNS settings may be obtained automatically , hence in order to see this on command prompt type 'ipconfig/all' and make sure the DNS settings are correct .


  1. Release your and renew your DHCP and DNS details.

If you have configured to obtain the IP address and DNS address automatically(Using DHCP) you can release those details and request for a new configuration. There are chances that your IP address may have conflict in your network or the details of DNS server is old, performing the below action will release the details and  obtain the details once again.

  1. Open command prompt and type 'ipconfig /release', ENTER which will release the IP details.
  2. Type 'ipconfig /renew', ENTER will request for an new IP details to the DHCP server and get the latest details.
  3. Now check your 'network adapter' or 'ipconfig /all' to see the details are renewed once again.

  1. If the DNS server is reachable through basic network testing, but it is not responding to DNS queries from clients.

Please use  'nslookup' to check whether the DNS resolve the name.

  1. Open command prompt and type 'nslookup'. It will direct you to nslookup prompt.
  2. Type your server host name or IP address and make sure that it resolve the query. That is when you type the  IP address of your server or client it should display the hostname.
  3. If it does not, please restart the DNS server service from the server. Open DNS console-> Select the 'DNS server'->Actions-> All tasks->Stop/start.
  4. Now use the 'nslookup' to know whether it helps.

  1. The DNS server has been configured to disable the use of its automatically created default reverse lookup zones.

There are chance that your zones are configured and kept to pause on DNS server make sure that it is started.

Right click reverse lookup zone that is existing in DNS console and select 'properties'->Under general tab make sure that the 'status' as running. If not 'start'->Apply->OK.


              4. Make sure that DNS server is not using a nonstandard configuration

As you know the default DNS server port is UDP 53 all queries using 'nslookup' will be listen through this port.  If the DNS server is located on another network and is reachable only through an intermediate host (like a router or proxy server), the DNS server might use a nonstandard port to listen for and receive client requests. So make sure that none of the intermediate firewall or proxy server configuration is intentionally used to block traffic on well-known service ports that are used for DNS. If not, you might be able to add such a packet filter to these configurations to permit traffic to standard DNS ports.

The DNS server does not resolve names correctly

  1.  The DNS server does not resolve names for computers or services outside your immediate network.

DNS servers uses the recursion process to resolve the names that are not located within the configured DNS domain name that is used by the DNS servers and clients. Hence we can confirm that server has a problem with its ability to correctly perform recursion.
For recursion to work successfully, all DNS servers in the path of a recursive query must be able to respond to and forward correct data. If not, a recursive query can fail for any of the following reasons:
  1. The recursive query times out before it can be completed(By default, the DNS service uses a recursive time-out of 15 seconds).
  1. A remote DNS server fails to respond.
  1. A remote DNS server provides incorrect data.

  1. The DNS server is not configured to use other DNS servers to assist it in resolving queries.

Check whether the DNS server can use both forwarders and recursion. By default, all DNS servers are enabled to use recursion, although the option to disable its use is configurable in DNS Manager to modify advanced server options. The other possible situation in which recursion might be disabled is if the server is configured to use forwarders and recursion has been specifically disabled for that configuration.

  1. The DNS server does not have network connectivity to the root servers.

Test for connectivity to the root servers. If root hints appear to be configured correctly, verify that the DNS server that is used in a failed query can ping its root servers by IP address. If a ping attempt to one root server fails, it might indicate that an IP address for that root server has changed. Reconfiguration of root servers, however, is uncommon. A more likely cause is a full loss of network connectivity or in some cases, poor network performance on the intermediate network links between the DNS server and its configured root servers. Follow basic TCP/IP network troubleshooting steps to diagnose connections and determine whether this is the problem.

  1. Check whether there are issues in Dynamic updates and zone.

There are chances you your dynamic updates are not working and issue with your zone. Use the below MS link to troubleshoot those issue.


  1. The Domain Name System (DNS) server is affected by a network failure.

Verify that the server computer has a valid functioning network connection. First, check that related client hardware (cables and network adapters) are working properly at the client by using basic network and hardware troubleshooting steps. If the server hardware appears to be prepared and functioning properly, check that it has network connectivity by using the ping command to contact other computers or routers (such as its default gateway) that are used and available on the same network as the affected DNS servers.

  1. Use nslookup

nslopkup is one of the CLI tool that will help you to analyze the DNS queries. You can make use of this by command prompt. This tool will help you to analyze the and verify that name resolution is working. Secondly, if name resolution isn't working, it allows you to confirm which DNS server is being used.
Please make use of the below link to have more idea about using nslookup.

  1. Try an alternate DNS server.

Most organizations have at least two DNS servers. If your primary DNS server is having problems, try using an alternate. If name resolution begins working after you switch DNS servers, you have confirmed that the problem is indeed related to the DNS server and not to some external factor.

  1. Reboot the server

Try to reboot the DNS server and check whether it help you to resolve the issue.

How to install and configure Symantec backup exec 2010

Whereas the detailed installation guide is available with the Symantec site 

http://www.symantec.com/business/support/index?page=content&id=TECH159346

Download the installation package and purchase the License key from Symantec cooperation.
The package may contain the installation guide and other details depending on your download.
System requirement
Processor: Intel Pentium, Xeon, AMD, or compatible
Memory: Required: 512 MB RAM, Recommended: 1 GB RAM (or more for better performance). 
Free space required: 1.44 GB (Typical installation) and 2.32 GB (Includes all options).

Here are the steps to manage the installation.

1. In order to start the installation you need to double click on the 'Browser.exe' which will prompt you for the Language selection during the installation and you may be prompted with about 11 languages and here we are selected with 'English' for our installation.


2. After that, the introduction page will lead you to the various tasks that you can perform before the installation. Select the same as per your requirement and since this document is for Installation we will proceed for installation.


So in order to go for the installation please select the option 'Install Products' and which may lead you to the below window.
 
3. The same will provide you option to install and utilize these products such as
   a) Backup Exec
     Go for this option when you want to set up a Backup server and manage it at the first time without this you cannot                  manage and install the other features too.
   b) Backup Exec Remote agent
     This is the client agent that will help you for managing the backup of your client machines. In order to create and restore        the backups of client it is must to install the ‘Backup Exec Remote agent’ (Which is able to push from the server and               install directly too).
   c) Backup exec Retrieve
   d) Backup Exec Continuous Protection server


4. Here we are setting up the Backup server and all other services are related to that.So expand‘Backup Exec’  and select        'install' to start with installation process. OR you can see the read me file which will help you to get more idea about         Symantec backup 2010 and its added advantages. In order to view the read me expand the tree view and click on ‘Readme’.


5. Once you proceed with the installation it will provide you the details of ‘License Agreement’ read carefully and click on       ‘Next’ to continue.


6. The next window will take you to the window that asks you for the type of installation that you need to perform, Here you will be having two options that as 
 
    a) Typical installation
This will allow you to configure and install Backup exec with default settings and you don’t want to specify the installation        and configurations.
    b) Custom installation
It is the advanced mode installation that you can mention and make the configuration as per your needs, In order to have a     detailed description on the features we are selected here as ‘Custom installation’ and click 'Next'. 


7. The next window  will ask you for the components that you need to install which may usually include with
  a) Local installation
     This is meant for your first time installation which will install and configure the administration console for your backup administration, always make sure that you have selected this feature if this is the first time installation of Symantec backup Exec in your network.
  b) Remote installation
      This will enable you to administer the other clients in your network to respond with the Backup Exec actions (Remember that it will help you only to get the backup of your remote client).


8. Now the Installer will validate your system and its configuration that is relevant for Symantec Backup Exec. Once the automatic system check completes go through the validations check and make sure that there is no errors reported. If anything found you need to correct it and then only you can continue with the installation, the warnings can be viewed and mark it down (You may need this to troubleshoot if you face a problem on further steps).


9. On next you must specify your product key. You can either type it or import this. Please mention the same as you needed. In order to get the Trial version (60 Days) you can click on ‘Next’ without entering the License Key.


10. Here you need to specify the features that need to be installed with the Backup Exec. All these are optional and you must specify only those that required for you (Since the full back may contain all these it may increase the backup disk usage). You have the backup of all your windows server features with your System state backup and the features to back up the same can be skipped.


11. Now you need to specify the directory that where you want to install the Symantec backup Exec,By default the location will be ‘c:\Program Files\Symantec\Backup Exec’ (In the directory ‘c:\Program Files\Symantec’ is the location you will see all your other Symantec Products like antivirus and endpoint protection ) and you need minimum of 2GB free disk space for the product to be installed. Make necessary changes as per your needs.


12. Next you need to specify your system account that has administrator privilege to your domain (If your system is a member of a domain) or the local system user that has administrator privilege and password too.


13. If your username and password is correct and have proper privilege to make the changes in your Active directory you will receive the message as shown below.


14. Symantec Backup Exec will have the database to store it data related to the clients and operations with the Help of SQL Express 2005 or 2008 Editions. 
     a) Create a local backup exec  SQL express instance to store the database on
You can either specify a new installation to create a new database and instance, since I don’t have a SQL server installed on    my network I will go for this.
     b) Use an existing instance of SQL server 2005 or SQL server 2008 on the network
Here you are creating the database on existing database. While promoting as Existing database you may be prompted with     the instance name, user name and password to connect with the instance (Always make sure that the user that you specifies   here have the necessary permission to modify the details in database or you may fail to complete the installation and your backup). 


15. Now we need to specify that how should be your device driver need to be installed for the Tape drives. Here you have three options to go for,
a) Use Symantec device driver for all tape drives
    It is the recommended option from the Symantec and will help you to provide the device driver for all the tapes that we           are going to use.
b) Use Symantec device drivers for tape devices that do not already have drivers loaded
   The same will help you to give a device drives only for the tape that does not have the drivers installed and if the drivers        are installed already it will keep updated with the existing driver itself.
c) Do not use a Symantec driver option
   Always make sure that you have a separate device drivers for all the tape devices that you are going to use to have the           backups.


16. Since we have given the Option to install the components for Remote computer backup administration the next window will prompt you for that. Here I am skipping the same and for more information is available within my site itself, make a search and will find more information about that.
17. Now the installation will start as per  the configurations that we have specified and make sure that the all the five components installs successfully, If any of the components fails it will skip the complete installation.


18. Once the installation is success then it will show you the summery of installation and click on Finish to complete the installation steps. 
 
WISH YOU A HAPPY BACKUP